Basic NXT GIOX Setup and Configuration
1.0 Using Standard NXT Controllers
The NXT GIOX module is added to standard NXT controllers using Auto-configuration. The GIOX module is connected to the controller via one of the available RS-485 ports (these are labeled on a 4-door controller as TB1, TB3, TB5 and TB7).
- Power-down the NXT controller.
- Physically connect the GIOX module to one of the controller's RS-485 ports. If you are using more than 1 output module, the GIOX should not be powered from the controller's RS-485 port. It must be powered by a standalone power supply. When powering the GIOX separately do not connect the power (PIN 1) at the controller's RS-485 port.
- Power the NXT controller back up again.
- Locate the NXT controller in the hardware tree; Click Setup >> Hardware Setup >> All to display the hardware tree.
- The NXT gateway will be listed at the top and the NXT controller(s) will be listed beneath.
- Highlight the NXT Gateway and click the 'Auto Config' button on the ribbon bar.

- Auto-config will scan the NXT network to detect any controllers and connected I/O modules.
- Controllers should be found almost immediately.
- Assign an IP address or just click the Apply button if the controller already has been assigned an IP address.
- In the Status Messages grid you should see an 'AutoConfig complete' message.

- Close the Auto-configuration results page.
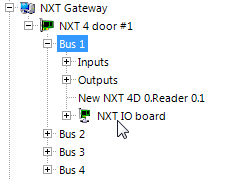
- Return to the hardware tree and double-click on the bus that has the NXT GIOX module connected.
- The NXT GIOX should appear listed beneath the controller inputs and outputs.
2.0 Using NXT Mercury-Powered Controllers
- Power-down the NXT Mercury Powered controller.
- Physically connect the GIOX module to one of the controller's RS-485 ports. If you are using more than 1 output module, the GIOX should not be powered from the controller's RS-485 port. It must be powered by a standalone power supply. When powering the GIOX separately do not connect the power (PIN 1) at the controller's RS-485 port.
- Power-up the NXT Mercury Powered controller.
- Locate the controller in the hardware tree (Setup >> Hardware Setup >> All).
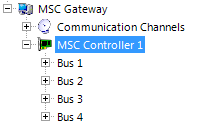
- The MSC Gateway will appear at the top of the hardware tree.
- The NXT-MSC controller will be listed beneath the MSC Gateway.
- Highlight the controller and in the controller properties ensure the controller is online.
- Double-click the controller to display its buses.
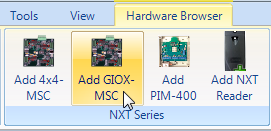
- Highlight the bus which the NXT GIOX is connected to, then click the 'Add-GIOX-MSC' from the ribbon bar.
- The GIOX module should almost immediately appear in the hardware tree beneath the reader on the selected bus.
- After a few seconds a notification dialog box appears stating where and what input or output cards have been detected on the GIOX module.
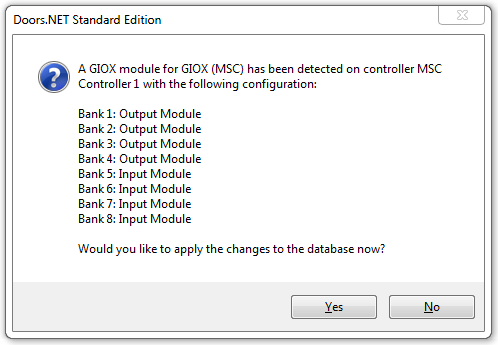
- Click yes to confirm that the detected hardware configuration is correct.
- The inputs and outputs will then be listed ready for you to select and configure.
3.0 Configure the GIOX Module
- If you click to highlight the GIOX module and ensure that Advanced View is enabled you will be able to view and configure the GIOX properties from the pane on the right. For example; you can assign a Device Type, a Filter or set the GIOX module to being a Global Linkage Trigger.
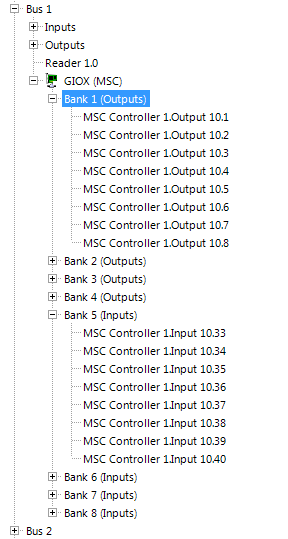
- If you double-click the GIOX you will see the GIOX inputs and outputs.
- Double-click either the inputs or the outputs to display the full list of what is detected on the GIOX module.
- Highlight any of the inputs and you will be able to configure the input from the property pane on the right.
- Highlight any of the outputs and you will be able to configure the output from the property pane on the right.
Note: If using MS or Wiegand readers a RIM can be physically connected to the controller or to the GIOX. This is useful if the GIOX is positioned near to a door but a distance away from the controller as you will only need to run short cable runs for the reader, lock, inputs or outputs. If you are using NXT Exit readers (two NXT readers on the same RS-485 port you can connect both the NXT readers to the controller), both to the GIOX, or you can have one reader connected to the controller and the other reader connected to the 485 port of the GIOX.