Custom Reader Behavior From RTE
Local Linkage allows you to configure how the reader behaves when an RTE event is generated. Local Linkage provides you with increased flexibility, such as you may want certain doors to not generate an audible alarm at the reader when someone uses the door. You can also decide what color you want the LED to display or how you wish the LED to behave.
Complete the following steps to program a reader to generate a single beep and to display a green LED when the RTE input is used.
Note: For this local linkage action to fully function the reader must have a buzzer function.
Note: The procedure is for a single card reader This procedure must be duplicated for each card reader that requires this procedure. Or you can use the Local Linkage Export feature once you have set it up for one controller and then use Local Linkage Import it to apply the procedure(s) to other controllers that have readers that also require this functionality.
Setup
This functionality requires the use of NXT-MSC or Mercury controllers and Local Linkage needs to be enabled on your license. It assumes the communications gateway is installed and up and running and that a controller has been added to the system and is online. The reader Manufacturer Model also needs to have been correctly selected in the hardware settings.
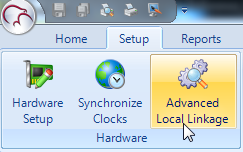
- From within the software click on Setup >> Advanced Local Linkage.
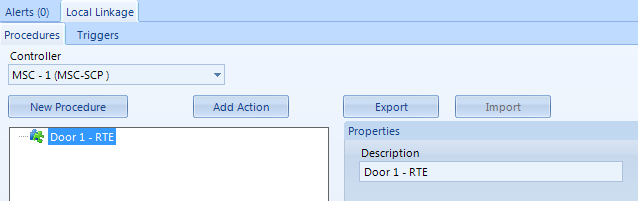
- On the Procedures tab select the controller which has the reader(s) you wish to configure this behavior on.
- Click the New Procedure button.
- Input a description for the procedure, such as Door 1 - RTE.
- Then save.
- With the new procedure highlighted, click the Add Action button.
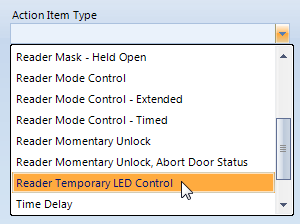
- Highlight the new action and you will see the Action Item Type pull-down list on the right.
- Select from the action type list 'Reader Temporary LED Control'
- Select the specific reader from the reader list.
- Set the On color to green and the on time to 900 ms
- The Off Color and Off Time can be left at the default values.
- Set Repeat to 9 and Beep to 1.
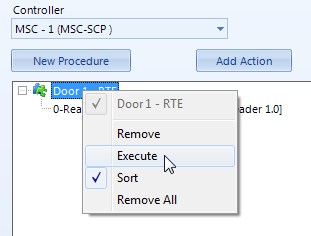
- Right-click on the new procedure name and select 'Execute'.
- If the reader is nearby you will see the LED turn green for approx. 5 seconds and you will hear 1 beep.
- Next, click on the Triggers tab.
- You now need to add the trigger that will action the reader behavior, the trigger will be an RTE event at this reader.
- Click the Add Trigger button then highlight 'New Trigger Condition 1'.
- Rename the trigger something like: "RTE event at D1'.
- Execute This Procedure - Select the procedure previously setup.
- Procedure Command - should be left at the default setting.
- Source Type - Select 'ACR: REX1 Input'
- Source - Select the reader for Door 1.
- Active During This Schedule - Select Always or you can restrict the Local Linkage action by specifying an alternative time schedule.
- Trigger Variable Logic should be left at 'None'.
- Open up Live Events and generate an RTE event for door 1. There are various exact event types generated depending on whether door contacts are being used or what the advanced reader options are:
- Make a note of the exact event type which appears in Live Events.

- This exact event type needs to be selected in the Transactions section of the trigger setup.
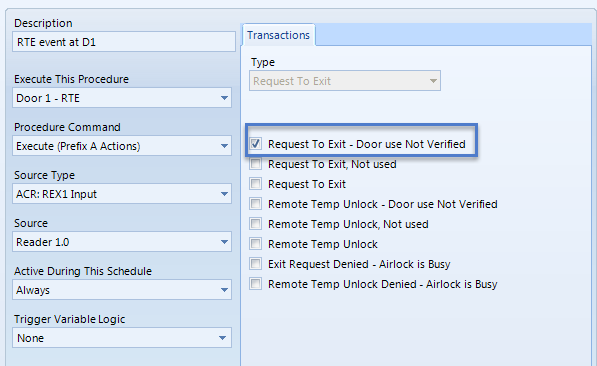
- Once your settings resemble the screen shot above, click save.
- Generate another RTE event at the same reader.
- You will then notice the new behavior at the reader and associated Local Linkage events will be generated in Live Events.

- This Local Linkage-specific events can be suppressed by setting up a filter then assigning that filter to the controller.
Related Topics