Neutron Controller Setup
1.0 Introduction
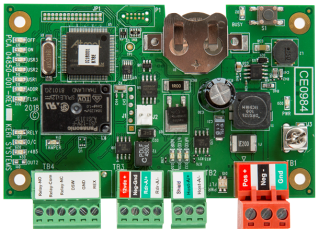
Neutron single-door controllers are setup and administered using the Visual Doors software
Notes:
- When Neutron is enabled on your license only Neutron controllers will be supported. You cannot mix and match Neutron with other controller types.
- When Neutron is enabled you will only be able to use the Visual Doors software. The standard Doors.NET software does not support Neutron controllers.
- Systems using Neutron controllers have a maximum capacity of 1,000 cardholders and 8 doors (16 x readers when using NXT Entry and Exit readers on each door).
- Neutron does NOT support multiple gateways.
- Neutron integration requires you to install Doors.NET v4.0.5 or later.
2.0 Connect the Neutron Comms Adapter
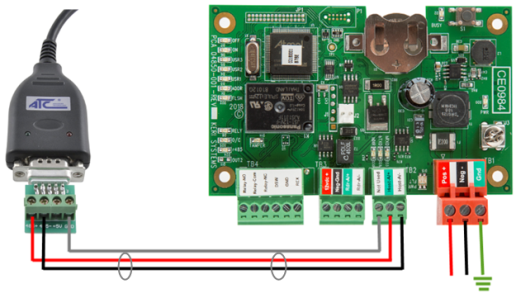
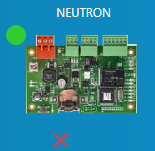
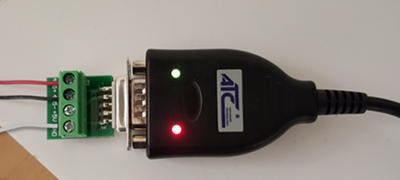
The Neutron Comms Adapter is used to provide communication to a Neutron controller network. It is a high speed USB-to-RS-485 (2-wire, half duplex) adapter that uses the FDTI serial to USB chip.
Using the terminal block that plugs into the adapter's DB9 connector, the module is hard-wired into one of the Neutron controllers (typically the controller located nearest to the host PC). The adapter will be automatically detected and installed and will be assigned a COM port number.
When you perform an auto-config all COM ports on the PC will be scanned and the USB-to-RS-485 module will be automatically found and used to detect the Neutron controller(s).
Notes:
- Every Neutron system required a Neutron USB-485 adapter and comms cable
- Plug the USB end of the cable into an available USB port on the host PC.
- The adapter should be installed automatically and you should be able to find it in Windows Device Manager.
- Connect RS-485+ of the adapter to TB2 A+ of the controller.
- Connect RS-485- of the adapter to TB2 B- of the controller.
- Connect the GND of the adapter to the RS-485 shield drain (only at the adapter end of the RS-485 network).
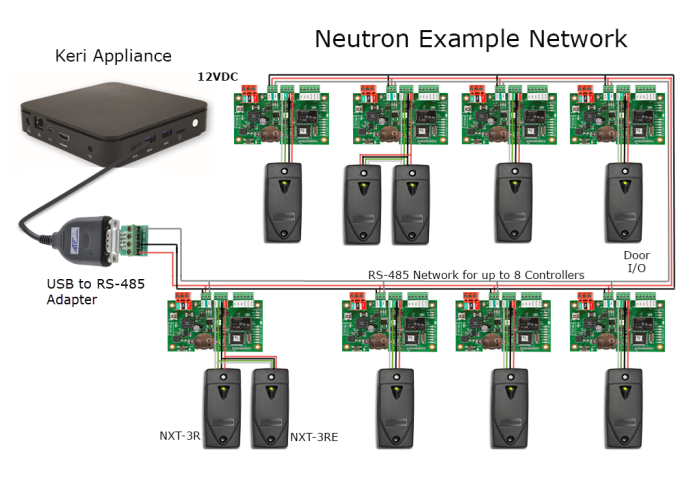
3.0 Controller Network Diagram
Network Schematic Using NXT readers
4.0 Auto-Config to Add Neutron Controllers
Neutron controllers are added to the system using Auto-Config. The Auto-Config feature will scan all available COM port on the PC and will detect which is being used by the Neutron comms adapter.
- Ensure the Neutron controller/network is powered-on (new controllers should also be factory reset)
- From the home screen click on the Hardware tile.

- When the Hardware screen opens click on the green 'Auto-Config' icon.
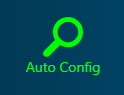
- Visual Doors will then scan all available COM ports on the PC and will detect the Neutron controllers on the network (via the USB-RS-485 network adapter).
- Once detected, the D33, D28 and D30 LEDs on the controller(s) should start blinking.
- On the Auto Config results window, click the APPLY button.
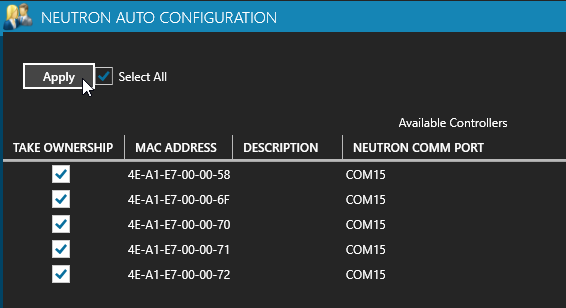
- Within a few seconds the controller(s) will be added to the hardware list and you will see an Auto-Config Complete message.
- Close the auto config window to see the controllers displayed on the hardware screen.
- A green status icon to the left of the controller indicates that the controller is online.
- The controller is now added and ready for further configuration.
- The red and green LEDs on the USB adapter will also be constantly flickering.
5.0 Neutron Controller Firmware Upgrade
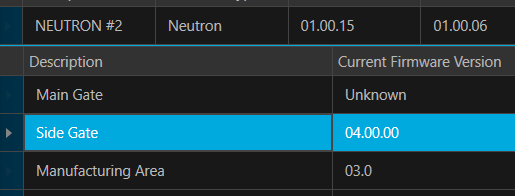
Once the Neutron controllers have been added to Visual Doors, it is likely that they will need a firmware upgrade. If a controller requires a firmware upgrade you will see a notification in the live events grid. The event will display which firmware version is required.
Perform the following steps to upgrade the firmware on a Neutron controller:
- Go to the Hardware screen and select the controller that needs to be upgraded.
- On the right side you will see the controller properties.
- Click on the UPGRADE FIRMWARE icon.
- Select the controller from the list.

- From the Select Firmware File drop-down list select the required controller firmware.
- Click the APPLY button and the firmware file will be sent out to the controller.
- It should take approximately 2 minutes to update the controller firmware.
Notes:
- To update the firmware on multiple controllers you should select the controllers first and then click on the APPLY button. If you select a second controller while a first controller is being updated it is likely that the upgrade to the second controller will not be successful.
- When you perform the firmware upgrade you will notice the progress bar reach 40% very quickly and then pauses. The remainder of the upgrade is slower and this is expected.
6.0 NXT Reader Firmware Upgrade
When using Neutron controllers in Visual Doors, it is also possible to upgrade NXT reader firmware (providing the reader is programmed with firmware v04.00.00 or later. If you upgrade the reader to the most current firmware version (v04.00.03) it will be configured to read standard NXT credentials and 125KHz HID credentials.
Here are the steps for upgrading NXT readers in Visual Doors (upgrading a reader from firmware v04.00.00 to v04.00.03):
- Go to the Hardware screen and select one of the listed controllers.
- Click the UPGRADE FIRMWARE button.
- Click the + symbol located to the left of any of the controllers you see listed.
- Select a reader which has the v04.00.00 firmware.
- From the Select Firmware File drop-down list, select the v04.00.03 firmware.
- Then click the APPLY button.
- The new firmware will be sent to the reader and the update percentage will be displayed in the status column.
- While the reader firmware is being updated the reader LED will blink green, amber and red.
- Once firmware upgrade is complete the reader will beep 5 times, the update percentage will show 100% and you will see an upgrade success notification.
- Confirm the notification and the new firmware version will then be displayed.