MR62E Controller Setup
1.0 Introduction

The Mercury MR Series 3 Serial Input/Output modules enable system expansion of HID Mercury intelligent controllers as part of HID’s distributed architecture. The enhanced modules offer an improved processor and increased memory, plus feature an embedded crypto memory chip that provides a secured layer of encryption to onboard sensitive data.
Built on the HID Mercury open platform, Series 3 modules provide the necessary flexibility for OEMs, channel partners and end customers to choose the controller
configuration that best fits their needs.
The MR62e is an IP-enabled interface module with on-board flexibility to connect a wide range of security devices. The MR62e is easy to install and provides the required I/O for interfacing four card readers using OSDP protocol, 6 general-purpose input monitor points, and 4 control relays to any Authentic Mercury series intelligent controller.
The following steps explain how to add an MR62E controller to Doors.NET. The most important thing to be aware of is the fact that you must first add an LP or MP controller to Doors.NET before you can add the MR62E.
Note: The MR62E is supported on all LP and MP controllers.
2.0 Verify that an LP or MP Controller is Added and Online
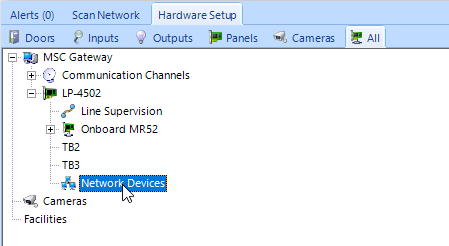
- In Doors.NET, go to Setup >> Hardware Setup >> All.
- The hardware tree will be displayed and the MSC gateway will be listed at the top.
- Controllers will be listed underneath the MSC gateway.
- Select the controller that the MR62E will communicate to.

- The controller properties will be on the right.
- Verify that the controller is online.

3.0 Configure the Network Protocol on the Controller
The next step is to configure a network protocol on the MSC controller to allow it to communicate with the MR62E controller.
- On the hardware tree, expand the controller and select the Network Devices node.
- From the ribbon bar at the top of the client, click on the Add Network Protocol icon.

- On the hardware tree, navigate to the new Undefined network protocol.

- The undefined network protocol properties will appear on the right.
- From the Protocol (Network) drop-down list, select Mercury Security.

- The Dialect can be left at the default of Controller Default.
- Save the network protocol settings.
- You will now be prompted to reset the controller. Confirm to proceed with the reset.
4.0 Bulk Erase and Configure the MR62E for DHCP
Before setting up a Mercury intelligent controller, a bulk erase should be performed to remove all existing configuration.
The MR62E controller will also need to be set to DHCP using the S1 dip switch. This will configure the controller to obtain an IP address from the local DHCP network. The following steps explain how to perform the bulk erase and then to set the controller to a normal operating mode (and a DHCP configuration).
- Power-down the MR62E.
-
Set the DIP switches S1 and 2 to the ON position.

-
Power-up the controller.
- LEDs 1,2,3 and 4 will start flashing alternately at a rate of 0.5 seconds.
-
Wait for these 4 LEDs to stop flashing.
- Within 10 seconds of these LEDs no longer flashing, set switches 1 and 2 into the off position. All 4 switches should then be in the off position.

-
The controller memory will now be erased. Full memory erase takes up to 60 seconds.
- Wait at least 2 minutes for the controller to obtain a DHCP address from the DHCP network.
5.0 Discover and Claim the MR62E
The next step is to scan for the MR62E module.
- From the Doors.NET hardware tree, select the Mercury Network channel that you created in step 3.
- Click the SCAN button.

- Doors.NET will then scan the network for controllers.
- Detected controllers will be displayed, including the MR62E module.
- Select the MR62E controller and click the IMPORT button.

- Click Yes to confirm you wish to go ahead with importing the controller to the select Network Port.

- A dialog box will appear allowing you to add more than one MR62E module. You can also change the default description/name of the controller(s).
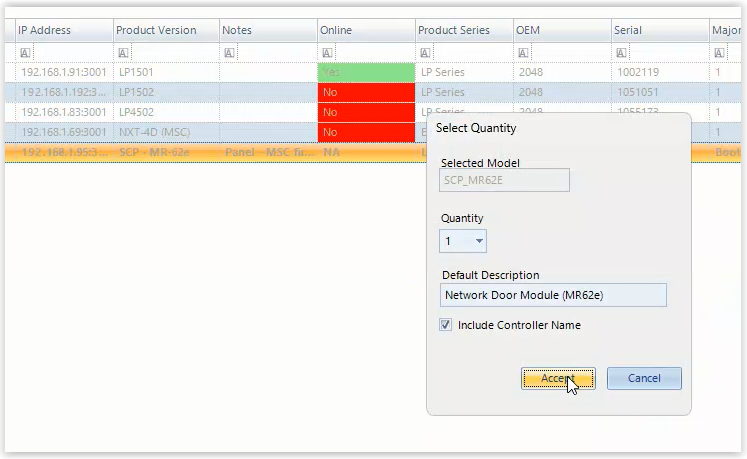
- Click the ACCEPT button to import the MR62E controller(s).
- The MR62 will be added to the hardware tree.
- Select the new module on the hardware tree.

- The module properties will be displayed on the right. The controller status should be online and if you look at the live events grid you will also see events being generated from the MR62E.