Full Reference Guide
Wiring Diagrams
Entraguard ONE/ONE+ Connections
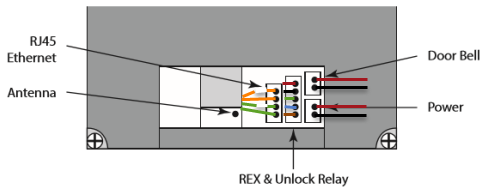
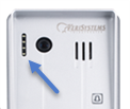
- The antenna must be connected when using the Wi-Fi connection method. The antenna can be easily connected using a flat-head screwdriver to carefully press the connector onto the small round socket located on the PCB.
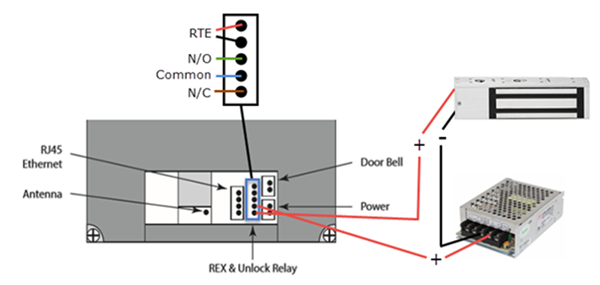
Wiring a Maglock
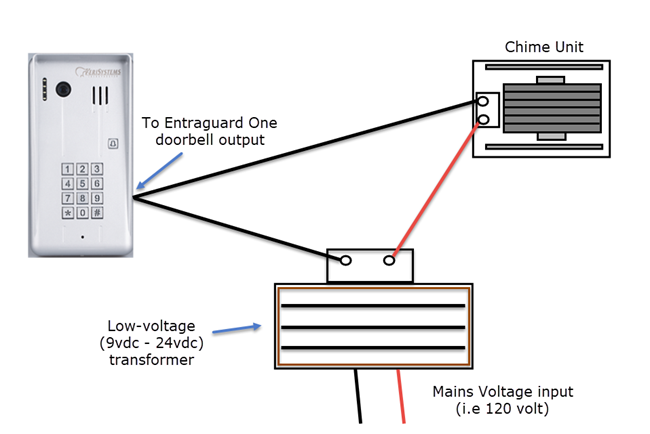
Wiring a Door Chime
Important Setup Information
To avoid any potential setup issues, Keri strongly recommends the following checks (prior to setup):
- Ensure 'Smart Switch' is off (Samsung Android devices) - it can be switched back on once setup is complete.
- Ensure mobile data 3G/4G is off (all Android devices) - it can be switched back on once setup is complete.
- When connecting to the unit via Wi-Fi, ensure the Wi-Fi antenna is connected.
- Ensure you have the Entraguard unit's ID (found on the back of the unit beneath the QR code) - this will help you to identify the unit when you need to connect to it.
- Check you will be adding the Entraguard unit to a 2.4GHz Wi-Fi network.
The Entraguard ONE/ONE+ is NOT compatible with 5GHz Wi-Fi networks.
- If you have a Wi-Fi network environment that consists of multiple access points (using the same SSID and passwords), you may experience intermittent connection issues. You can confirm this by testing a connection to the unit via 3G/4G.
Download the App
- The minimum supported Android version is 4.2
- The minimum supported iOS version is 8.0
Before you can use the Entraguard ONE/ONE+ you must download the Entraguard ONE app. Android users can download the app from Google Play and iOS users can download the app from the iOS App Store. Search for the app using: 'Entraguard'.
Complete the installation of the app on your smart device.
- The Entraguard ONE app is free to download and use.
- Please keep the Entraguard ONE app updated to the latest version.
- The app is subject to change without prior notification.
Setup and Log in with a New User Account
- Ensure your smart device is connected to your local Wi-Fi network (and on the internet).
- Open the Entraguard ONE app.
- Click the Sign Up button.
- Enter a new user name.
- Enter a new password.
- Confirm your new password.
- Confirm you have read the terms and conditions.
- Press Submit and a registration success message will appear.
- You will see the login screen.
- Press Login to log into the app.
Factory Reset the Entraguard ONE/ONE+
You must now factory reset the Entraguard unit to put it into 'AP Mode' - so it can be discoverable as a 2.4GHz Wi-Fi network.
- Remove power from the Entraguard unit.
- Hold down the call button, then apply power.

- Continue to hold down the call button for a minimum of 2 minutes.
- The LEDs on the front of the unit will flash for the first time.

- A few seconds later you will hear a deep tone.
- You can now release the call button.
- Wait for the Entraguard LEDs to flash a second time before proceeding to unit configuration (up to 2 minutes).
- The unit is now factory reset.
Entraguard ONE/ONE+ Wi-Fi Setup - Android App
- Ensure 'Smart Switch' is off (for Samsung devices) - it can be switched back on once setup is complete.
- Ensure mobile data 3G/4G is off (for all Android devices) - it can be switched back on once setup is complete.
- Ensure you are connected to your local Wi-Fi network (the Wi-Fi that you use to connect to the internet).
- Log into the Entraguard ONE app with your user name and password.
- Press the Add icon.

- Press Configure via Wi-Fi button.
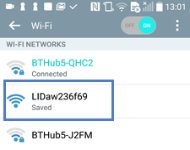
- Go to Settings >> Network Settings on your smart device and view the list of available Wi-Fi networks.
- Connect to the Entraguard's own Wi-Fi network. (It is the 2.4GHz network that starts with the letters 'LID' followed by the unit's unique ID (LIDxxxxxxxxxxxx)).

- Once connected, return to the app.
NOTE: On some Android devices connection will be automatic.
- Return to the app and press the Configuration button.
- Press Next.
- You will now see: 'Connecting' and 'Scanning the Wi-Fi list' messages.
- The name of your local Wi-Fi network should be displayed:
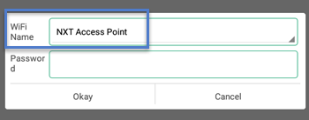
- Enter your local Wi-Fi passcode (this code will often be found printed somewhere on the reverse of your Wi-Fi router).
- Press Next.
- A success message will appear.
- Confirm the message and you will see the device details screen.
- Wait for the LEDs on the front of the unit to flash before proceeding to the next step (up to 2 minutes).
- Once the LEDs have flashed, enter the default password (1234), then save.
- You will see the device home screen.
- Press the thumbnail image to view live video.

Once the Entraguard is added to the app you will be able to connect to it over the internet, either via Wi-Fi or cellular/mobile (3G/4G) data.
Entraguard ONE/ONE+ Wi-Fi Setup - iOS App
- Ensure you are connected to your local Wi-Fi network (the Wi-Fi that you use to connect to the internet)
- Log into the Entraguard ONE app with your user name and password.
- Press the Add icon.
- Press Configure via Wi-Fi button.
- Steps 2 and 3 are noted on the Wi-Fi config screen, so click Configuration at the bottom of the screen.
- While on the AP Mode screen, go to the network connections on your smart device and view the available Wi-Fi networks. Connect to the Entraguard's own Wi-Fi network. (It is the 2.4GHz network that starts with the letters 'LID' followed by the unit's unique ID (LIDxxxxxxxxxxxx)).
- Once connected, return to the app.
- Enter the Wi-Fi passcode (this code will often be found printed on the reverse of your Wi-Fi router).
- Press Next.
- You will then be on the device details screen.
- Wait for the LEDs to flash before proceeding to the next step (up to 2 minutes)
- Once the LEDs have flashed, enter the default password (1234), then save.

- You will then see the device home screen.
- Press the thumbnail image to view live video.

Once the Entraguard is added to the app you will be able to connect to it over the internet, either via Wi-Fi or cellular/mobile (3G/4G) data.
Setup via Hard-Wired Ethernet, or add an Existing Device
There are 3 methods for adding an Entraguard which has been hard-wired to the Local Area Network - or which has previously been added (for example, via a different smart device):
- These options apply to both the iOS and Android apps.
LAN Search
- Press the green Add icon.
- Press Add Device Directly.
- Press Search
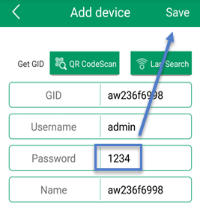
- The device unique GID will display.
- Press the entry (the green text) and the unit details screen will appear.
- Enter the default password of 1234.
- Press Save (in the upper-right).
QR Code Scan
- Press the green, circular Add icon.
- Press Add Device Directly.
- Press the QR Code button.
- OK the prompt to allow the app to access your camera.
- Hold the phone up to the QR Code located on the reverse of the unit.
- The device details will appear immediately.
- Enter the default password of 1234.
- Press the Save (in the upper-right).
Manual Add
- Press the green, circular 'Add' icon.
- Press Add Device Directly.
- Manually enter the unit's unique GID into the 'Device ID' field. As with the QR Code, the GID can be found on a sticker located on the reverse of the unit.
- Enter the default password of 1234.
- Enter a new description for the unit (optional).
- Press the Save (in the upper-right).
Connect from Multiple Smart Phones/Tablets
The Entraguard ONE/ONE+ supports up to 4 simultaneous connections. Each connection should be from an app using a unique ID. You should NOT connect to the unit using the same user account on different devices.
You should initially add the Entraguard one/one+ to one of the smart devices and then, once connected and setup, add the unit as an existing device to the other smart devices (see previous sections).
IMPORTANT NOTES:
- You can concurrently connect iOS and Android devices to the same Entraguard unit.
- You can add an unlimited number of Entraguard units to your app.
- Each Entraguard unit will support up to 4 concurrent connections.
- Each connection should use a unique account - you should not connect from different devices with the same user name and password.
The following instructions explain how to connect from 2 different client devices.
- Setup the Entraguard ONE/ONE+ on the first smart device using the instructions in sections 4.0 or 5.0 (depending on whether you are an Android or iOS user).
- Install the Entraguard ONE app on the second smart device and log into the app with a new user account.
- On the second smart device, follow the instructions in section 6.0 to add the Entraguard ONE/ONE+ as an existing device.
Entraguard ONE/ONE+ Configuration
The following section explains how to edit and adjust the Entraguard unit's settings. Most of these settings are found via the edit icon, which can be located via a left-swipe on the device home screen.
Set Time
Once you have added the unit you will need to manually set the time. This ensures accurate functionality of features, such as notifications and viewing live video.
- On the device home screen, swipe left, then press the edit icon.
- Press the Advanced Settings button.
- Press Set Time.
- Confirm the prompt and the unit time will be synchronized with the time on your smart device.
IMPORTANT NOTE: As well as setting the time when initially adding the unit, you will also need to manually set the time if the unit loses power or following a Daylight Savings change.
Set the Unlock Time
The unlock time is configurable from 1 to 100 seconds. The Entraguard unit's unlock time, by default, is set to 1 second.
- From the device home screen, swipe left, then press the edit icon.
- Locate the unlock time setting, then press the value it is set to (default is 1).
- Enter a new door unlock time of between 1 and 100 seconds.
- Press OK.
NOTE: The unlock time is user/app-specific. Therefore if you have multiple remote connections to the same unit, each client can use a different unlock time.
Enable One-Key Unlock
The One-Key Unlock feature gives you the less-secure option of unlocking the door immediately following a single press of the unlock icon. By default you are required to enter an unlock password (default is 1111).
- From the device home screen, swipe left, then press the edit button.
- Locate the One-Key Unlock option and press the highlighted icon to enable it. The icon will turn green.
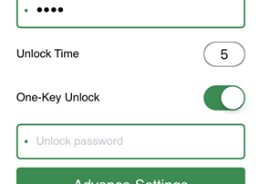
- Enter the unlock password (default is 1111).
- Press Save.
Change the Unlock Password
By default you are required to enter a 4-digit password before you can unlock the door. The default unlock password is 1111, but we advise changing it as soon as possible:
- From the device home screen, swipe-left then press the edit icon.
- Press Advanced Settings.
- Select Modify Unlock Password.
- Enter the existing unlock password (default - 1111).
- Enter a new unlock password.
- Confirm entry of the new unlock password.
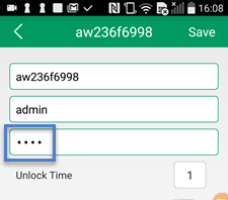
Change Device Password
The default password for the Entraguard ONE/ONE+ is 1234 so Keri recommends that you change the default password as soon as possible (after adding the device to your app).
- From the device home screen, swipe left, then press the edit icon.
- Press Advanced Settings.
- Select Modify Device Password.
- Enter the existing password (default is 1234).
- Enter a new password.
- Confirm entry of the new password.
- Press Save (upper right).
NOTE: If the device password changes and other clients connect to that same device, you will need to alter the password in the settings of the remote apps.
- In the remote device apps, swipe-left on the home screen and press the Edit icon.
- Enter the new password in the field you see highlighted below, then save:
Enabling Notifications
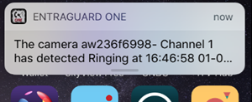
Notifications will bring your attention to the fact that someone is calling you via the call button located on the front of the Entraguard.

Or you can receive notifications with the Motion Detection option - when motion is detected by the on-board camera. The Notifications will appear even if the app is closed.
- Press the user main menu icon in the upper left of the device home screen.
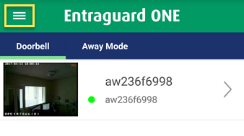
- Press Settings.
- Enable the Notify Vibrate Mode option.
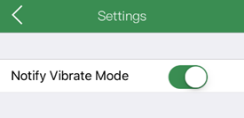
- Your device is now configured to receive notifications.
NOTE: If notifications are not working, check the following:
- Ensure the Entraguard unit is online.
- Check in your smart device settings and ensure notifications are enabled for the Entraguard ONE app.
- Verify that you are connected to the internet.
- Ensure in the app that the mode is not set to 'Silent'.

Accepting or Declining Calls
- When the ring notification appears, click the green icon to accept the call and to talk to the visitor.
- To speak to the visitor, press and hold the microphone icon.
- To listen to the visitor, release the microphone icon.
- To decline and hang-up the call, press the red icon.
Viewing and Deleting Notification Events
When notification are generated, either from calls or from motion detection, they are also stored as events in the app. To access the notification events, go to the live video window.
- If there are notification events there will be a number next to the bell icon in the upper left.

- Press this icon and a list of events will appear for you to review.
- Press and hold down on any event, you will then have the option to delete.
- Android app users also have the option to block delete the entire list of events.
Enable Motion Detection
Motion Detection, when enabled, will instruct the Entraguard app to generate an notification when motion is detected by the on-board camera. When a notification is received you can quickly check the live video feed. The feature is either disabled or active 24/7 but by default the feature is disabled. The following steps explain how to enable the feature.
- From the device home screen, swipe left and press the edit icon.
- Go to Advanced Settings.
- Select Motion Detection.
- Press the icon highlighted to enable the feature (it will go green).
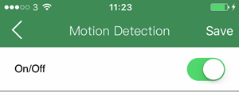
- Then Save.
Reboot or Restore the Unit
Reboot - Clears the current configuration and then re-loads it from the app. Following a reboot you will have to wait a minimum of 2 minutes before the unit comes back online.
Restore - A restore will completely reset the Entraguard unit to its factory defaults. Following a reset you will have to wait a minimum of 2 minutes before the unit configures as 'AP Mode' and can then be added as a new unit.
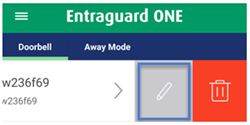
- Left-swipe the unit listed on the home screen.
- Press the edit icon.
- Press Advanced Settings button.
- Select Reboot/Restore.
- Select to either reboot or restore the unit to its factory default settings.
Delete the Unit from the App
- Left-swipe the unit listed on the home screen.
- Press the Delete icon.
- The unit will be removed from the app but it will still be connected to the local network (and so can still be re-added as an existing device).
Programming the Entraguard ONE+
These instructions only apply to the Entraguard ONE+ (which has the keypad). There are various administrative functions that can be directly performed using the keypad, but before you change any of the settings, you should first change the programming code.
Change the Programming Code
- Remove power from the Entraguard ONE/ONE+.
- Press and hold the * key as you apply the power.
- When you hear a long, continuous tone, release the * button.
- Enter a new 4-digit programming password (same length as the default) - another long tone will be heard.
- Press * to exit the programming.
Enter Programming Mode
- Press the * key and a short tone will be heard.
- Enter the 4-digit programming code (default - 1234) and a long tone will be heard - you are now in programming mode.
- You must begin programming the unit within 30 seconds or you will be automatically logged-out of programming mode. To manually log out of programming mode, press the * key again.
Set the Door Unlock Time (default is 1 second)
- Enter programming mode.
- Press 00 - a long tone will be heard.
- Enter 2 digits (for the amount of time you wish for the unlock time). For example, enter 05 to program the door with a 5 second unlock time. Minimum unlock time is 1 second, the maximum unlock time is 100 seconds.
- After entering the new unlock time, press * to exit programming mode.
Add User Access Codes
The Entraguard ONE+ supports a maximum of 40 unique access codes (used for direct access at the unit).
NOTE: User slot numbers 31-40 are reserved for a momentary pulse function. For users assigned these slots numbers, the door will always unlock for 1 second. Described in more detail in the next section (8.5).
- Enter programming mode.
- Enter 2 digits (from between 01-30) - this will be the unique slot number where the new code will be stored. For example; enter 01 to use slot number 1.
- Next, enter a 4-digit user code. For example; enter 1981 - Another long tone will be heard.
- Press the * key to exit programming mode.
NOTES:
- You are not limited to using just 4-digit codes, you can also program the Entraguard to accept from 2-6 digits. See section 8.7 for setting the length of user access codes.
Momentary Pulse Function
User slot numbers 31-40 are reserved for a 'momentary pulse' function. Users who are assigned to these slot numbers, authenticate with their PIN code, the door will then unlock for 1 second (regardless of the unit's programmed unlock time).
Delete User Access Codes
The following steps explain how to individually delete access codes.
- Enter the programming mode.
- Press the # key - you will hear a long tone again.
- Enter the user code that you wish to delete. For example; 1981
- Press the * key to exit programming mode.
Set the Length of User Access Codes
- Enter programming mode.
- Press 99 - A long tone will be heard.
- Enter between 2 and 6 digits to set the desired access code length. For example; enter 4 and the access code length will be 4 digits (this is the factory default value) - Another long tone will be heard.
- Press the * key to exit programming mode.
Delete All User Settings
- Enter programming mode.
- Press the # key - a long tone will be heard.
- Press the # key 7 times - after 3 seconds you will hear the long tone again.
- The factory default settings will now be set. For example; a 1 second unlock time and 4-digit length access codes.
NOTE: Setting the factory default settings does NOT change the programming password.
User Guide
Using the Intercom
When the visitor calls, the device will receive the ring notification. Ensure that notifications are correctly enabled on your smart device. You can click 'Accept' or 'Decline' on the pop-up call alert in the app.
To speak to the visitor:
- Press the microphone icon once and it will go green -
 to enable the microphone.
- Press and hold the Press to Talk icon.

- The Press to Talk icon will also go green - meaning you can now talk.
- Release the icon and it will go back to gray - you can now listen to the visitor.
Unlocking the Door

You can unlock the door using the app while on the live video screen. The default password for unlocking is 1111 and the default unlock time is 1 second (both values can be changed). You can also use the One-Key Unlock feature to not require a password when unlocking the door from the app.
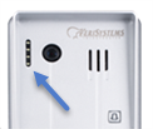
- Press the thumbnail image on the device home screen to view live video.
- Press the Unlock icon.
- By default, you will be prompted to enter a password.
- Enter the unlock password (the default value is 1111).
- The door will unlock for the configured unlock time.
Viewing Live Video
Press the thumbnail image on the home screen to open the live video window. The Entraguard unit's time stamp is displayed in the top left of the live video screen. Beneath the live video window are the icons that allow you to: capture an image, capture recorded video, listen to the Entraguard unit's surrounding environment, talk to a visitor or to put the live video window into full screen mode.
Image Capture
Click the  icon to capture an image which will be stored on your smart device.
Video Capture
Click the  icon to start a video recording. The icon will turn green when video is being recorded. Click the green camera icon
  and recording will be complete and will be stored on your smart device.
Locating Image and Video Files
By default, the image and video files will be saved to your phone and can be accessed via the Entraguard ONE app.
- From the device home screen, press on the Main Menu icon in the upper-left.
- Press the Media option.
- The first tab is the recently created files - these will be either images or video files.
- Press the Video tab to view all the video files which have been saved.
- Press the Photo tab to view all the images which have been captured.
- To delete any of the files, press and hold the thumbnail image then confirm the prompt.
Changing Modes
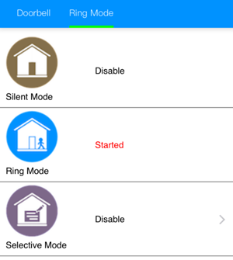
There are three different modes for the Entraguard ONE app (Silent Mode, Ring Mode and Selective Mode) and are applied on a per user basis. Using modes allows you to custom configure how notifications are received and is most useful when there are multiple smart devices connecting to the same Entraguard unit.
Silent Mode - Silent Mode suppresses all notifications (ring notifications and motion detection notifications).
Ring Mode - The default mode is Ring Mode and when in use, ring notifications and motion detection notifications will be received.
Selective Mode - Useful if you have multiple Entraguard units added to the same app. Selective Mode allows you to control which Entraguard unit receives notifications and which ones will be silent. For example, if you have two Entraguard units added, selective mode allows you to turn off notifications for one and keep them on for another.
The following steps explain how to change the mode.
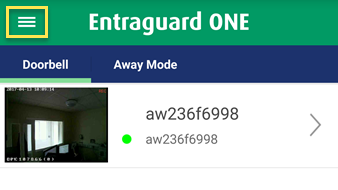
- From the device home screen, press the current operating mode.

- The three available modes will be listed.
- Press a new mode to change to (Android users will be prompted to confirm the change) - the new change will take effect immediately.
- If you change to Selective Mode you will need to press edit and then specify which of the listed Entraguard units will be configured to send notifications - Finally, press Save.
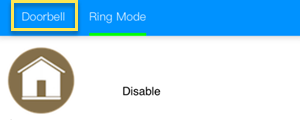
- Press 'Doorbell' to return to the device home screen.
User Account Configuration
Change User Account Password
- From the device home screen, press on the main menu icon in the upper-left.
- Press the head and shoulders image (with the user name displayed beneath it).
- Select Change Password.
- Enter the current user password.
- Enter the new password.
- Re-enter the new user password.
- Press Done.
- You will be automatically logged-out so you will need to log in again with the new password.
Change Password Verification Question
To change the custom question and answer for password retrieval:
- From the device home screen, press on the main menu icon in the upper-left.
- Press the head and shoulders image (with the user name displayed beneath it).
- Select Change Verification.
- Enter the existing user password.
- Enter a new custom question for password retrieval (for example; birthplace or mother's maiden name)
- Enter a custom answer (recommended 1-word answer).
- Press Save.
Log Out of the App
- From the device home screen, press on the main menu icon in the upper-left.
- Press the head and shoulders image (with the user name displayed beneath it).
- Press the red Logout button.
- You will immediately be logged out of the app.
Password Recovery Process
If you have forgotten your password you can obtain a temporary password as long as you still know your custom verification answer.
- From the login screen, click on the Login button.
- In the bottom right-corner, click on 'forgot password?'
- Enter your unique user name.
- Press Next Step.
- Enter the custom answer to your custom question.
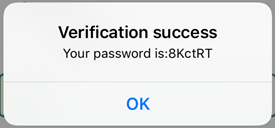
- If the custom answer is correct then a new temporary password will be generated.
- Log in with this temporary password then follow the steps in section 10.2 to change this password.
Further Technical Information
Related Documents
For troubleshooting information, please refer to document part number 01679-002 'Entraguard ONE/ONE+ Troubleshooting Guide' and for the product specifications, please refer to the Entraguard ONE/ONE+ data sheet - P/N 01692-001.