1.0 Introduction
This document explains how to use the Allegion No Tour feature in Visual Doors. Credentials are enrolled and updated using the MT20W USB enrollment reader. Following enrollment, the access rights information is written to the card and then subsequently written to the locks upon first presentation to the card reader.
IMPORTANT NOTES:
- Visual Doors in ONLY used for cardholder enrollment and administration. Setting up and creating access groups is performed using the Aetheros Web Portal (http://allegion.aetheros.net). This document assumes that you will already have an Allegion Aetheros site created with your locks added and ready to use.
- Allegion Aetheros requires the host PC to have an active, unrestricted internet connection (as you are required to log into your Allegion account which is hosted in The Cloud).
Allegion Administrative Tasks Supported in Visual Doors:
- Enrolling new No Tour credentials
- Assigning Access Rights
- Deleting Credentials
- Replacing Credentials
- Change Credentials to Temporary
This setup guide assumes that you have an existing Allegion Aetheros system setup and configured using the Allegion ENGAGE app and the Aetheros Web Portal. The guide also assumes that you have used the Web Portal (allegion.aetheros.net) to setup access groups. Once the Allegion Aetheros system has been setup you can administer and enroll No Tour cardholders from Virtually any PC that has Visual Doors installed.
2.0 Licensing Requirements
Allegion No Tour is a licensed feature and therefore must be enabled on your Doors.NET license. To check your license has Allegion No Tour enabled, perform the following steps:
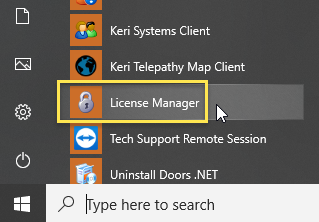
- From Windows Start menu, go to Doors.NET >> License Manager.
- When the License Manager window opens, select Application Server from the list on the left.
- Click on the License tab and the list of licensed features and components will be displayed.
- Scroll down the list and locate: Supported Hardware >> Aetheros Allegion No-Tour - Ensure this is set to True (as highlighted).

- If No Tour is enabled you can close the License Manager window.
If No Tour is set to False you will need to contact Keri Systems inside sales.
3.0 System Requirements
- A supported Windows PC with Doors.NET v4.0.3.4 installed.
- A supported smart device (Android or iOS) with the Allegion ENGAGE app installed (this app is initially used for capturing your Control, NDE or LE locks and the MT20W USB enrollment reader) and also the Keri Mobile app installed (this app is used to send certain updates out to the locks - for example: new access groups and access group changes).
- A registered Allegion partner account.
- Partner account site should be registered and setup at www.allegion.aetheros.net
- Schlage Control, LE or NDE locks.
Note: No Tour is supported on any NDE lock manufactured after February 2016 (with firmware 02.10.08).
- An MT20W USB Enrollment reader.
4.0 Log in to Visual Doors
Visual Doors software is automatically installed when you install the Doors.NET (v4.0.3.4) software. If selected during install, you will have Visual Doors Desktop and Start menu shortcuts:
 (or you can access Visual Doors from the following location on the host PC C:\Keri\DoorsNET\Visual Doors.exe
- Double-click the Visual Doors icon to open the login window.
- Enter the username and password (the default for both is admin).
- Click on the small white cog if you need to specify a remote IP address for the Application Server.
- Click the LOGIN button.
- Visual Doors will open and you will see the homescreen.
- You should see the Allegion tile.
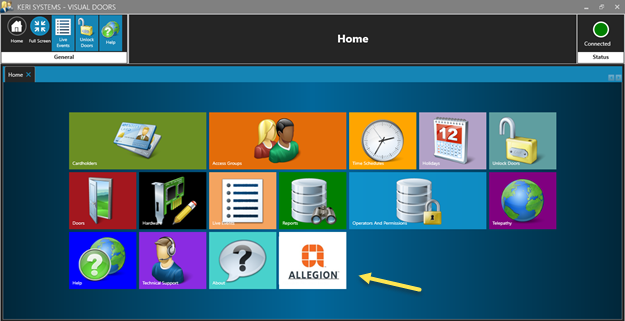
You are now ready to start enrolling new No Tour credentials.
5.0 No Tour Credential Enrollment
Note: Visual Doors client is only used for enrolling and administering No Tour credentials. It is NOT used for setting up or modifying access groups. Access groups are created and edited using the Web Portal (www.allegion.aetheros.net) and access group updates are sent to the locks using the Keri Mobile app.
- Click on the Allegion tile to open the Allegion log in window.
- Log into Visual Doors with your Allegion ENGAGE user name and password.
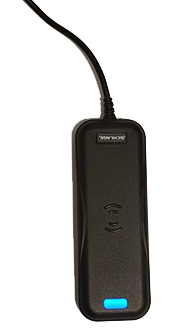
- Ensure your MT20W USB enrollment reader is connected to the PC and displaying a solid blue LED (indicating that the reader is connected via Wi-Fi).
- The Cardholders screen will appear.
- Click the green Add icon.
- Enter a first name and a last name for the new record.
- Enter an e-mail address for the new record.
- Enter a location for the new cardholder (for example: work location).
- Select if the cardholder will never expire or if it will expire at the end of the day.
- Click the ADD button to create the new cardholder record.
- Place the No Tour credential onto the USB enrollment reader - the LED will go green and the reader will beep every few seconds.
- Click the ADD CREDENTIAL button and the card number will appear in the Choose credential box (you may see multiple card numbers).
- Select the correct card number.
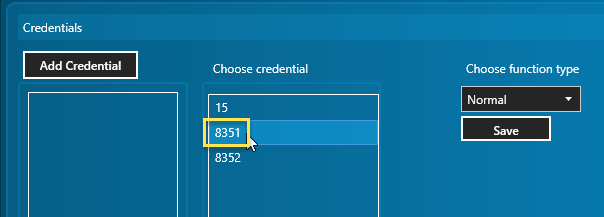
- Click the SAVE button.
- Go to the Access Rights tab and click the ASSIGN ACCESS button.
- Select a doors/locks that the cardholder will have access to.
- Select a time schedule to associate with the locks (to determine when the cardholder will be able to gain access).
- Click the SAVE button.
- Repeat steps 16-18 for any additional doors that the cardholder will have access to.
- Wait for the MT20W USB Enrollment reader to beep three times.
- The No Tour credential will be programmed with the access rights.
- You will now be able to gain access with the card.
Notes:
- Cardholders that are set to 'Expire Daily' will have to be re-enabled at the beginning of each new day. The are re-enabled by presenting the card again to the USB enrollment reader.
- The One-Time Use setting is NOT supported on the Control locks. If a credential is set to One-Time Use it will get access denied on the Control locks.
6.0 Credential Function Types
There are several credential function types to choose from:
- Normal - This mode unlocks the lock momentarily (with specified relock delay period).
- Toggle - Changes the state of the lock from locked to unlocked, or vice versa.
- Freeze - Freezes the lock in the current state. Lock remains frozen until Freeze credential is presented again. Disables all other credentials except for Pass Through.
- One Time Use - Allows only one Normal access per assigned lock.
- Pass Through - Unlocks a lock momentarily, regardless of state. Overrides a lock in Freeze and Lock Down states.
- Lock Down - Changes the state of the lock to locked and disables all credentials except for Pass Through and Freeze. Present a Freeze to return lock to normal state.
- Block - Denies access to the lock and records the access attempt as an audit.
- Delete with Alarm - A delete with audit/alarm credential will log an audit entry that the credential was used. However, the credential will NOT unlock the door. If an alarm is available on the lock, then the alarm will sound. This functionality is the same as the “blocked” credential type.
- Update from Server - Update from server credential will trigger the update from server in SF210 mode irrespective of lock state. In Sf200 mode this credential will be treated as invalid credential.
- Update From Server + Normal - Update from server+Normal credential will behave as normal credential and then trigger the update from server in SF210 mode irrespective of lock state. In SF200 mode this credential will be treated as normal credential only.
7.0 Removing and De-activating Credentials
The following steps explain how to edit and administer No Tour credentials in Visual Doors: This section assumes you have connected the USB enrollment reader to the host PC and the reader should be displaying a solid blue LED.
7.1 Delete a Credential
Deleting a credential will immediately remove the credential from any lock that the credential was added to.
- Select a cardholder from the list on the left.
- On the cardholder's General tab select the credential that you wish to delete.
- Click the DELETE CREDENTIAL button. The credential will immediately disappear.
- Press the credential to the MT20W until the reader beeps 3 times.
- The card will now be updated and will no longer be able to gain access.
7.2 Delete a Cardholder
Deleting an Allegion cardholder from Visual Doors will completely remove the card from the software and also from the locks that the cardholder had access to:
- From the cardholder list, select a cardholder.
- Click the large red DELETE icon then click the small black DELETE button.
- Present the credential to the reader to remove the programmed access rights.
- Wait for the reader to beep 3 times.
- Remove the credential from the MT20W reader and it will now not be able to gain access at any of the locks.
7.3 Replace a Credential
Replacing a credential will program the same access rights as the previously enrolled card. Upon presentation of the replacement card the old card will be de-activated and the replacement card will be activated.
- Select a cardholder from the list on the left.
- Click the ADD CREDENTIAL button.
- Present the replacement credential to the MT20W reader.
- The replacement card number will appear in the Choose credential box.
- Select the new credential number.
- Click the REPLACE CREDENTIAL button.
- The old credential will be deleted.
- The new credential will need to be presented to the MT20W for the access rights to be written to it.
- Wait for the MT20W to beep 3 times. The credential will then be programmed.
8.0 Assigning and Unassigning Access Rights
Notes regarding No Tour access rights:
- There are two methods of assigning access to cardholders, either 'Individual Access' or 'Group Access'. With Group Access, doors are assigned to access groups and these access groups are then assigned to cardholders. With Individual Access, the access rights are assigned directly to each lock (you simply select which locks the cardholder will have access to. A cardholder can use one of these methods. You cannot have a system that uses both Individual Access and Group Access.
- When you remove or disable a cardholders access rights you will have to physically visit the individual locks and update them via Bluetooth using the Mobile app. To immediately de-activate a cardholder you have the option of deleting the assigned credential - once the credential is updated using the MT20W it will be immediately removed from the locks upon the next card presentation.
-
When a cardholder is assigned an access group and you go to tab "Access Rights", you can see the list of devices that are assigned to that group, but you can not assign new devices to the user because the cardholder is assigned a group.
- If the cardholder is using 'individual access' then the ADD TO GROUP button will be greyed-out (because you cannot assign an access group to a cardholder that has individual access'
8.1 Assigning Individual Access
The following steps explain how to assign individual access to a cardholder.
- From the Visual Doors home screen, click on the Cardholders tile.
- Select a cardholder from the cardholder list on the left (or enroll a new cardholder).

- Select the cardholder's assigned credential.
- Go to the Access Rights tab.
- Click the ASSIGN ACCESS button.
- The locks on the system will appear.
- Select a lock that the cardholder will have access to, then select a valid time schedule.
- Click the SAVE button to create the assignment (the lock and time schedule will appear in the Available Access Rights list.
- Present the card to the MT20W enrollment reader and wait for the reader to beep three times.
8.2 Un-assigning Access Rights
If you un-assign access rights (you de-select a lock from the cardholder record) you will need to update the lock and there are three different ways that you can update the lock:
- Using the Keri Mobile App... (see section 8.0)
- If the lock is configured with a Wi-Fi connection, it has be scheduled for automatic updates... (see section 9.0)
- Linking the lock to a Gateway - Updates can be initiated directly from the Web Portal... see section 10.0)
9.0 Lock Updating Using the Confluence Mobile App
Certain changes cannot be written to the credentials and so the lock will need to be updated manually. Changes such as removing access rights and deleting credentials will require a manual update. This section explains how to update the locks using the Keri Mobile App.
- In Visual Doors, make a change, such as removing a cardholder's access rights (i.e. de-selecting a lock on the assign access rights screen).
- Physically visit the lock that you unassigned and ensure you are within Bluetooth range of the lock.
- Open the Aetheros Mobile App on your smart phone/device. Log in with your ENGAGE username and password.
- Tap the site name. The app will then scan for locks on your site that are within range.
- Any lock that requires an update will have an update indicator against it. As shown here:
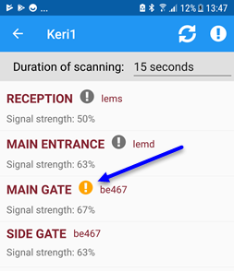
- Tap on the lock name and the app will give you the options to either Unlock or Connect.
- Select Connect.
- The app will connect to the lock and once connected the current database information will be downloaded.
- You can disconnect from the lock once the door settings screen appears - the disconnect icon is in the upper-right corner
 .
.
- Once disconnected, the update indicator will have disappeared from the app and the card will no longer be able to gain access at that lock.
10.0 Lock Updating When the Lock is Connected via Wi-Fi
If the lock is setup with a Wi-Fi connections then you can configure the lock to be automatically updated twice each day. The following steps explain how to configure the lock in the Aetheros web portal to be updated at 9am and at 6pm. Setting the lock up with a Wi-Fi connection is covered in the Aetheros No Tour - Quick Start Guide.
- In Visual Doors, make a change, such as removing a cardholder's access rights (i.e. de-selecting a lock on the assign access rights screen).
- Go to the Aetheros Web Portal >> Devices >> Devices list - you will see that the lock has an update indicator against it.
- From the Action drop-down list, select Edit to open the lock settings screen.
- In the lower-right corner locate the Database download time settings.
- For Option #1 set the time to 09:00am.
- For Option #2 set the time to 06:00pm.
- Click the SUBMIT button.
- You will now need to update the lock using the Mobile app.
- Once the update is completed, the lock will then receive a full database download at 9am and 6pm.
- You can make as many changes as you wish... they will all be queued-up and sent at once during the scheduled download.
- Following the schedule download the update indicator will disappear from the device screen of the web portal.
11.0 Lock Updating When the Lock is Connected to a Wi-Fi Gateway
Certain database changes will require a 'door file update', for example, changes to access rights or removing access rights from a cardholder. The following steps explain how to update the locks via the Gateway:
- From the device list in the web portal, click on the Gateway entry.
- Click on the Allegion Gateway.
- The device screen will appear and the linked devices will be listed.
- Use the drop-down list for a lock that requires an update.

- Select Sync Database from the list. Status indicators will inform you of when the update has completed.
- Once update is complete the pending update indicator will disappear.